Band Designs
This page looks at three key areas of ring design, focusing on the band:
- The profile of the band
- The shape of the shoulders in stone set rings
- The finish of the metal
Read on for ideas on to find out more about all these aspects of a bespoke ring design.
Band Profiles
When designing a ring, one of the decisions you’ll need to make is the profile of the band. The profile needs to be selected for it’s appearance and how well it works with the design but also how comfortable it is to wear. Everyone will have a different opinion on it so it is important to try on the different profiles to find which works for you. This will also help you decide how wide you would like the band to be.
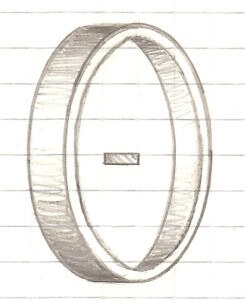 |
FlatRectangular in cross section, this is a crisp and clean profile which works well with Princess cut stones for a contemporary feel. The crispness can be softened slightly if the corners are rounded off. You see the true width of the band with this style, whereas the more rounded designs can make the band appear more slim than it actually is. |
 |
Flat with a gentle curveThis is a more modern looking take on the D shape profile. Essentially, it has a less deeply curved outside edge but retains the flat interior profile. |
 |
D-shapedThis design looks just like a capital D through the cross section. The flat part sits against the finger but the outside edge is deeply curved. This can trick the eye into thinking the band is slimmer than it actually is so you may wish to opt for a slightly bigger width to achieve the look you’re going for. The nice thing about this shape is that stacked D shape bands have a clear edge next to each other, whereas flat bands can blur into one. |
 |
Reverse DThe reverse D profile is the exact opposite of the D shape profile. The outside is flat for a contemporary look but the inside is curved for comfort. As with the flat profile, the corners can be softened slightly for a less harsh edge or you could opt for a gentle curve on the outside profile. |
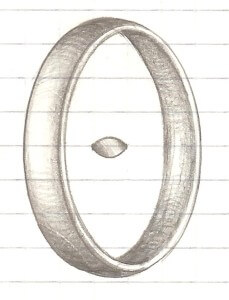 |
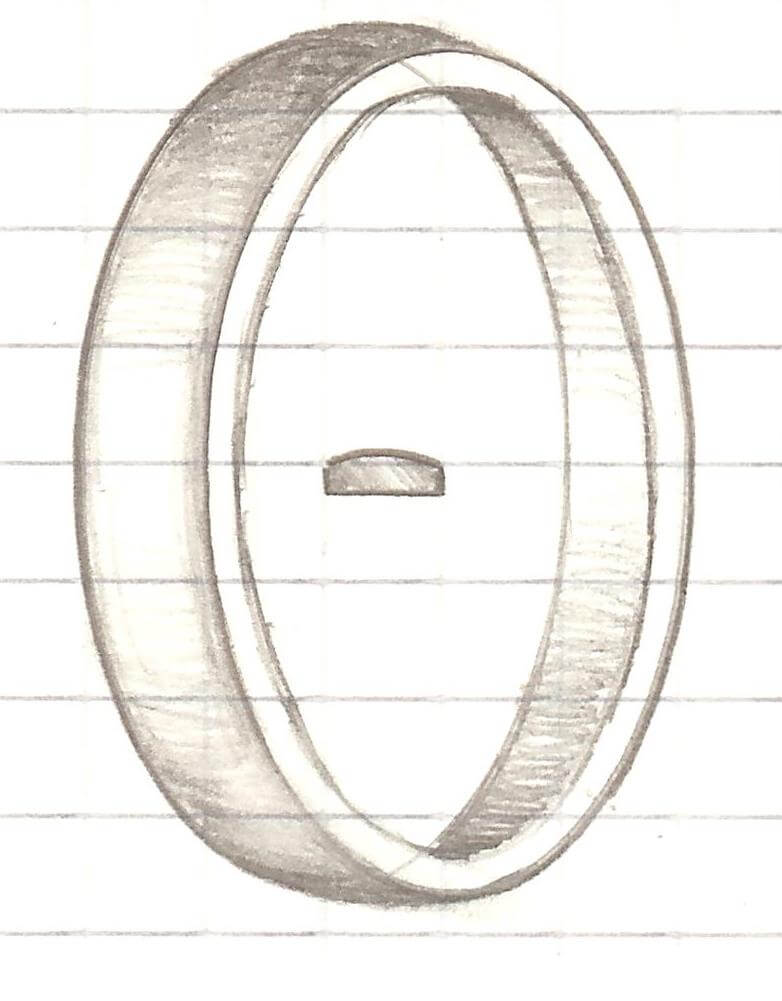
CourtingThis profile is sometimes called ‘Comfort’, which gives a good indication of why people choose it! It is curved both on the inside and outside for a soft, curved look and comfortable wearing. The cross section is eye-shaped and this is particularly good as a wedding band for anyone not used to wearing rings. The edges can be flat between the outside and inside of the band or curved for an elliptical profile. Courting can also come in a heavy style, which means that the thickness at the widest part is deeper than normal. |
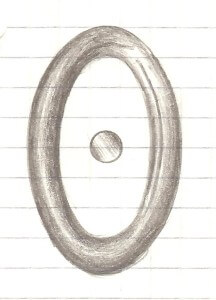 |
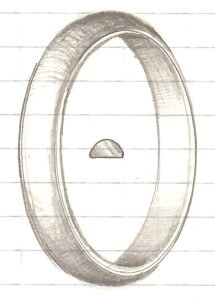
HaloThis profile has the cross section of a circle as it is fully round. This is an unusual choice for slimmer bands but has a really interesting look and is comfortable to wear. Halo profile rings make great stacking rings because you get a clear definition between each ring. |
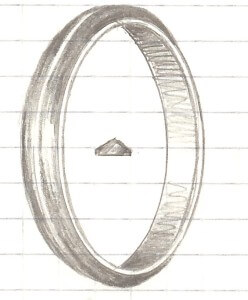 |
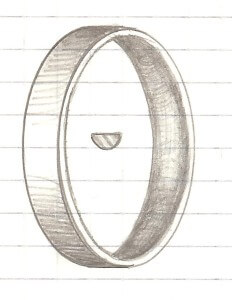
KnifeThe knife profile is a striking style, perfect for engagement rings with square, kite or Trillion cut stones. It is flat on the inside but has a peaked shape on the outside, so when viewed in cross section, it appears triangular. This shape can be softened at the sides and back of the ring for comfort. |
Shoulder Shapes
If you’re having a stone set ring, you’ll then need to consider the shape of the shoulders of the ring.
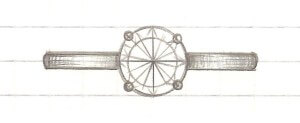 |
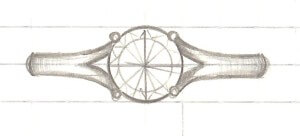
StraightStraight bands have no curves and give a classic look. If you want a low-key ring, this is the one for you. You can add stones into the shoulders or use this design for a trilogy ring. If your setting is wider than the band width, you’ll need to consider a shaped wedding band to sit next to it or perhaps an open-tip setting style to allow a flat band to sit comfortably beside it. |
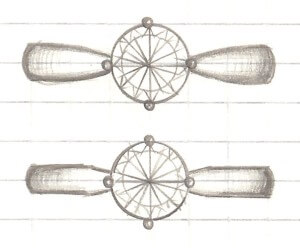 |
TaperedThe tapered band works to lead the eye towards the central stone. Essentially, it slims down towards the top of the ring. You can still have stone set in the shoulders, perhaps in a tapered setting. There are lots of options with the tapered band – it can either be a gentle, curved taper as in the top image, or a short, sharp taper as in the second. You could go for a long straight taper as well. |
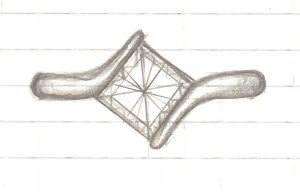
 |
SplitThe split shoulder works really well with a four claw setting as shown in the illustration because the band meets the setting really cleanly. It work like the taper style to draw your eye into the centre of the ring and gives a lovely, balanced look. You could add an invisibly set side stone into the end of the splits for added sparkle. You’ll need a waved wedding ring to sit along side this design. |
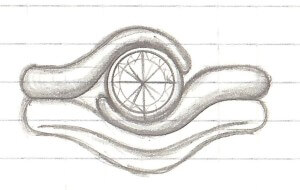 |
TwistThe twist style has become really popular as an alternative to the straighter styles. The band usually tapers down as it wraps around the central stone. It works best with rounder shaped central stones such as Brilliant, Oval and Pear but it also works well with a horizontally set Marquise shaped stone. These twist styles sit best with a shaped wedding ring as depicted in the illustration. |
|
|
BypassThe bypass style band twists round the stone for a fluid appearance but does not close off like a twist does. It works well with straighter stone shapes like the Princess cut shown here. This design could be paired up with a wishbone shaped wedding ring. |
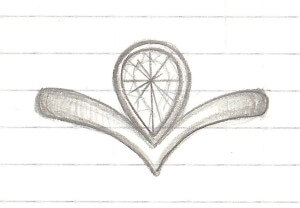 |
WishboneAnother option is the wishbone shape which works with any shaped stone but particularly well with a Pear shape as shown. It gives you the option to stack it with another wishbone ring underneath, or wear another wishbone ring ‘upside down’ above it to enclose the stone. |
Metal finish
The finish of the metal is a design element you’ll want to consider no matter what type of jewellery you are designing or choosing. A combination of finishes on a piece of individual jewellery can be really striking. Each finish will have a different aesthetic which you may be drawn to or may suit a design more than others, but it is worth considering the durability of each type and how therefore, it will suit your lifestyle.
Polished
A brightly, polished finish is the classic choice.
It is achieved by the goldsmith firstly sanding the metal to a faultless smooth finish with emery paper and then using a range of polishing mops and compounds to bring the metal to a glossy, shiny glow. The emery paper obviously scratches the metal but you may be surprised to learn that polishing scratches the metal too. Look at a polished finish under a microscope and it is a see of tiny, invisible to the naked eye scratches. It is these scratches which give the shine!
In terms of wear, a polished finish will wear to a dull shine over time.
Matt
A matt finish is the exact opposite to the polished finish – it will make any facetted stones stand out more from the metal because it will contrast with them.
The matt finish is achieved in the same way as the polished finish is started, using emery paper to achieve a flawlessly smooth feel.
Durability wise, the matt effect is a light finish that will collect scratches and knocks with wear, as with any other finish, but these scratches will be polished so will stand out more than scratches in a polished finish. It can be re-applied periodically but you will need to part with your piece of jewellery each time and will loose small amounts of metal each time. Left alone over time, a matt finish will wear to an attractive dull shine.
Hammered
A hammered finish gives metal a rustic, dug up feel. It can be paired with either a polished or matt finish, depending on the look you are after.
Pin End
The pin end finish is achieved through the use of a special pin mop. It gives a lovely ‘roughed up’ texture, a bit like a deeper, more hard wearing, matt finish. It works particularly well when paired with a polished finish on different parts of the design.
Beaded or Millgrained
The beaded, otherwise known as the millgrained finish, is a gorgeous touch for any vintage inspired piece of jewellery. It works well around the edges of rings or settings to add sparkle and detail to the metal. It is applied using a special tool which stamps into the metal and ‘beads’ up the surface of it.
Pavé texture
The Pavé texture is created in the same way as the beaded finish and creates an all over sparkle to the metal. Small stones can be incorporated to this using the Pavé setting style to emphasise the sparkle factor!